hacklink hack forum hacklink film izle hacklink marsbahisizmir escortsahabetpornJojobetcasibompadişahbetjojobet

Tag: perfect

  • How To Make Lahsuni Chicken Masala Thats Perfect For Any Occasion

    How To Make Lahsuni Chicken Masala Thats Perfect For Any Occasion

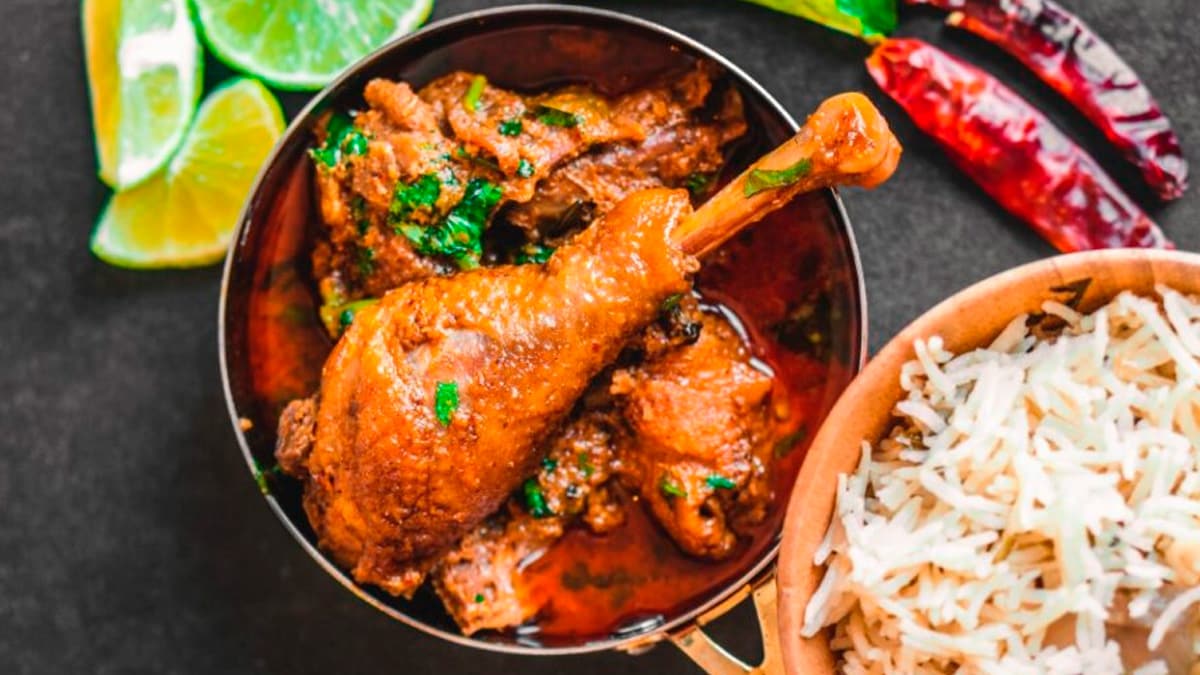
    Indian food is known for its bold flavours and spices, and whether you’re into veg or non-veg, there’s always something new to try. As foodies, we love experimenting, right? Eating the same old dishes can get a bit boring, though. If you’re a chicken fan, you’ve probably had your fair share of butter chicken, chicken korma, and kadhai chicken. But sometimes, the same flavours can get repetitive. If you’re in the mood for something new, give Lahsuni Chicken Masala a try. Infused with garlic, it packs a spicy punch that will totally wow your taste buds. It’s the perfect dish for a dinner party or any special occasion, and trust me, it won’t take long to whip up!

    Also Read: Chicken Lovers, This Boneless Chilli Chicken Recipe Will Become Your New Obsession

    Latest and Breaking News on NDTV

    Here’s How You Can Make Lahsuni Chicken Masala:

    1. Marinate the Chicken

    Start by heating some ghee in a pan. Add a tablespoon of chopped garlic and let it roast lightly. Turn off the heat and put 500 grams of chicken into a bowl. Add in the roasted garlic, turmeric, red chili powder, coriander powder, kasuri methi, green chillies, and ginger paste. Squeeze in the juice of half a lemon, mix it all up, and let it marinate for 20 minutes.

    2. Make the Onion-Tomato Paste

    Heat some oil in a pan, then fry 3 chopped onions and a teaspoon of garlic. Add 2 chopped tomatoes and cook until everything softens. Make sure the onions don’t burn, and once the tomatoes are nice and mushy, turn off the heat. Let it cool and blend into a smooth paste.

    3. Fry the Chicken

    Heat a teaspoon of oil in a pan and fry your marinated chicken pieces. Once they’re a little cooked, add your onion-tomato paste and stir. Let the chicken cook in the paste for a while, then add some curd. Continue cooking for a few minutes.

    4. Prepare the Special Masala

    Now, let’s amp up the flavour! In a separate pan, roast 1 teaspoon of whole coriander, a cinnamon stick, black peppercorns, and two small cardamoms. Grind these into a powder, and after the curd has cooked in with the chicken, add this fresh masala and a pinch of salt to the gravy.

    5. Add Cream for That Rich Texture

    Once the chicken is fully cooked and the spices have soaked in, add a little cream to make the gravy super-rich. Throw in some long chopped green chillies, kasuri methi, and fresh coriander leaves, then turn off the heat. Your delicious Lahsuni Chicken Masala is ready to impress!

    You can adjust the consistency of the gravy to your liking, but don’t overdo it – too much gravy doesn’t do this dish justice. So, the next time you’re hosting a dinner or just having a family get-together, serve up some Lahsuni Chicken Masala, and prepare to win everyone over!

    Happy Cooking!

    Source link

  • This Protein-Packed Rajma-Matar Tikki Is The Perfect Snack For Your Weight Loss Journey

    This Protein-Packed Rajma-Matar Tikki Is The Perfect Snack For Your Weight Loss Journey

    Tikki is one of those snacks that’s hard to say no to. Crispy on the outside and soft on the inside, just one bite is enough to make us crave more. Wouldn’t you agree? With so many tikki recipes to choose from, it can be difficult to resist these cravings. However, tikki is usually deep-fried, making it an unhealthy choice for those trying to lose weight or eat healthily. But don’t worry, you don’t have to give up your tikki cravings. Instead, you can modify the recipe to make it healthier and weight-loss-friendly. One such gem that deserves your attention is this Rajma and Matar Ki Tikki.
    Also Read: Weight Loss: Nutritionist Shares High Protein, High Fibre Tikkis You Can Enjoy Guilt-Free

    What Makes Rajma And Matar Ki Tikki A Must-Try?

    This tikki is perfect for those who want to enjoy a snack without worrying about extra calories. Made with ingredients like rajma, matar, and vegetables, it’s packed with nutrition. It’s a tikki that’s not only healthy but also offers the best flavour. Whether as an evening snack or a starter for a dinner party, it’s sure to delight your taste buds.

    Can You Have Rajma And Matar Ki Tikki On A Weight Loss Diet?

    Absolutely! Both rajma and matar are excellent sources of protein, making this tikki ideal for weight loss. Not only that, but they are also rich in essential vitamins and nutrients. The fact that this tikki is pan-fried adds to its nutritional value. You can also air-fry it to make it even healthier.

    What Can You Serve With Rajma And Matar Ki Tikki?

    Pair this delicious tikki with any chutney of your choice. Whether it’s spicy pudina chutney, tangy tamarind chutney, or a sweet version, it’ll taste amazing with them all. If chutneys aren’t your thing, enjoy the tikki with some tomato ketchup.

    How To Make Rajma And Matar Tikki | Rajma And Matar Tikki Recipe

    This recipe was shared by the Instagram page @thespicystory. To begin, add boiled rajma and matar to a large bowl. Mash them well using a masher. Add grated carrots, onions, ginger, green chillies, green onions, and boiled potatoes. Next, add roasted besan, chaat masala, salt, pepper, garam masala, and coriander powder. Mix everything together. Now, take a small portion of the mixture and form a tikki using your hands. Repeat the process with the remaining mixture. Place the tikkis on a non-stick tawa over a low-medium flame. Drizzle some oil over them as they cook. Flip and cook on the other side. Serve hot and enjoy!

    Watch the complete video below:

    Also Read: Can’t Get Over Crispy Aloo Tikkis? Try These 5 Easy Ways To Make Them Healthier
    Looks delicious, doesn’t it? Make this tasty tikki for your next snacking session and enjoy it completely guilt-free!


    Source link

  • Bathua Dosa: This Green Dosa Recipe Is Perfect For Your Winter Indulgence

    Bathua Dosa: This Green Dosa Recipe Is Perfect For Your Winter Indulgence

    As soon as winter arrives, Indian kitchens start brimming with seasonal vegetables. From wholesome spinach to delightful carrots, the list is endless. One of the stars of this chilly season is Bathua. Packed with nutrients and a delightful earthy taste, bathua can be used in many comforting dishes like parathas, raitas, and even pakoras. If you love this leafy green vegetable, then we have a special recipe for you – Bathua Dosa. This delightful dosa recipe is a nutritious green twist on your regular dosas that is a must-try in this chilly weather. Serve it as a wholesome breakfast or light dinner, this Bathua dosa is a perfect way to embrace winter. So, roll up your sleeves and let’s learn how you can make this at home! 

    Also Read: Indian Cooking Tips: 5 Ways To Make Bathua Paratha Healthier

    Latest and Breaking News on NDTV

    How Does Bathua Benefit Your Body?

    Bathua, as a winter green, is extremely beneficial for your body. Let’s find out how does bathua benefit your body.

    1. Keeps Constipation At Bay

    If digestive issues keep troubling you, then bathua can provide relief! Thanks to its high fibre and water content, bathua helps keep your digestion smooth and healthy.

    2. Helps Lose Weight

    Bathua is low in calories and rich in fibre and supports weight loss by curbing your hunger pangs. Add it to your diet in various ways, like this dosa recipe, to enhance your weight loss journey.

    3. Purifies Blood

    Bathua helps detox your body, promotes blood purification, and gives you a clean and radiant complexion if you consume it regularly.

    4. Promotes Hair Growth

    Since it is packed with proteins, vitamins, and minerals, bathua can be a great addition to your diet, especially if you struggle with hair fall.

    What Can You Pair With Bathua Dosa?

    Bathua dosa pairs beautifully with classic go-tos like sambhar and coconut, balancing the dosa’s earthy flavours with a splash of flavours. For a healthier twist, you can stuff it with a paneer filling, roll it up and serve it as a wholesome snack or lunchbox option. Its slightly thicker texture makes it perfect to hold fillings. You can also experiment with fillings like sauteed vegetables to make them even more wholesome!

    Latest and Breaking News on NDTV

    How To Make Bathua Dosa | Bathua Dosa Recipe

    Making bathua dosa at home is pretty easy. This recipe was shared on Instagram by content creator @keertidacooks. To make this:

    1. Soak Grains

    Take 1/3 cups of whole moong and 2 tablespoons of rice. Wash them thoroughly before soaking them overnight or for 7-8 hours. 

    2. Prepare Batter

    Once the grains are done soaking, drain the water. Transfer them to a blender jar along with bathua leaves, green chillies, ginger, cumin seeds, ice cubes (for a vibrant green colour), salt and water. Blend all the ingredients thoroughly and make a smooth batter.

    3. Make Dosas

    Once the batter is ready, heat a tawa. Grease it with a dash of oil and pour a ladle full of bathua dosa batter over it. Spread evenly to form a round shape. Cook evenly from both sides and enjoy fresh with chutney and sambhar!

    Watch the full video below:

    Also Read: Indian Cooking Tips: 5 Ways To Make Bathua Paratha Healthier

    Will you try this bathua dosa recipe at home? Let us know in the comments below.


    Source link

  • 7 Quick Tips For Perfect Sarso Ka Saag Every Time

    7 Quick Tips For Perfect Sarso Ka Saag Every Time

    Sarso ka saag is the go-to dish when the cold season hits, and we’re here to spill the secrets on how to make it a delicious breeze! Creamy white butter slathered on Sarso Saag, paired with the perfect Makki ki Roti – talk about a taste explosion! Not only is this Punjabi classic a flavour bomb, but it’s also a nutritional powerhouse thanks to the mighty mustard greens. Now, let’s address the elephant in the room – making sarso ka saag isn’t a walk in the park for everyone. Many find it a daunting task, especially if you’re a kitchen rookie. But fear not! If you’re planning to savour the goodness of Sarso Ke Saag this winter, we’ve got your back with foolproof tips to make Punjabi Sarso Ke Saag at home. Yes, even if you’ve never stepped foot in the kitchen, you’re in for a treat – no mistakes allowed!

    Also Read: 6 Surprising Reasons Laal Saag Deserves A Spot In Your Winter Diet

    Latest and Breaking News on NDTV

    Here Are 7 Quick Tips for Perfect Sarso Ka Saag Every Time:

    1. Choosing the Right Ingredients:

    To kickstart your journey, gather fresh mustard greens, spinach, and bathua (if available). Opt for tender leaves to ensure a smooth texture. The pungent kick of mustard greens blends harmoniously with the mildness of spinach, creating a symphony of flavours. Don’t forget to add ginger, garlic, green chillies, and a couple of tomatoes to the mix for that perfect balance.

    2. Prepping Like a Pro:

    Begin by washing the greens thoroughly to remove any dirt or impurities. Chop them finely to facilitate easy cooking and ensure a velvety consistency in your saag. A pro tip: add a pinch of salt while boiling to retain the vibrant green colour of the leaves.

    In a rush? Can’t cook?

    Order from

    3. The Pot Matters: 

    Sarso Ka Saag demands the right vessel. Use a sturdy pot that can withstand slow cooking. Tradition meets taste when you let the saag simmer to perfection. A heavy-bottomed pot is your ticket to the velvety texture that makes this dish legendary.

    4. The Art of Slow Cooking:

    Sarso Ka Saag is a dish that rewards patience. Slow cooking is the key to unlocking its rich, earthy flavours. Use a pressure cooker or a deep pan, and let the ingredients simmer together. The longer they dance in harmony, the better the saag tastes. As the greens break down, their essence melds into a delightful amalgamation.

    5. Tempering:

    In a separate pan, heat ghee and add cumin seeds, chopped garlic, and green chillies. Allow this aromatic concoction to infuse, releasing a fragrance that will make your kitchen feel like a haven of spices. Pour this tempering over your simmering saag, and watch the magic unfold.

    6. Makki Ki Roti – The Perfect Companion:

    No Sarso Ka Saag experience is complete without its partner in crime – makki ki roti. Crafting these cornflour discs may seem daunting, but fear not, for simplicity is the key. Knead the dough with warm water, roll it into bite-sized portions, and pat them into flat circles. Cook on a hot griddle until golden brown spots appear. The rustic charm of makki ki roti complements the saag impeccably.

    7. Garnishing:

    As your kitchen becomes a haven of enticing aromas, prepare for the final touch – garnishing. Drizzle a generous amount of ghee on top, adding a decadent richness to your creation. If you’re feeling adventurous, sprinkle some garam masala for an extra burst of flavour. A dollop of fresh butter is the crowning glory that elevates your Sarso Ka Saag to a culinary masterpiece.

    Also Read: Why Bathua Saag Is A Must In Winter: Discover Benefits From Weight Loss To Hair Growth

    In conclusion, making Sarso Ka Saag is not just about cooking; it’s a journey that takes you through the heart of Punjabi traditions. With these quick and easy tips, even a kitchen novice can savour the joy of preparing this winter delight. So, roll up your sleeves, tie on that apron, and let the magic of Sarso Ka Saag unfold in your kitchen!

    Source link

  • 6 Game-Changing Tips To Make Perfect Aloo Kulchas On Your Pan

    6 Game-Changing Tips To Make Perfect Aloo Kulchas On Your Pan

    Punjabi food is renowned for its mouthwatering flavours and variety. From vegetables and curries to Indian flatbreads, there’s something for everyone. If you’re a fan of Punjabi cuisine, you’re probably familiar with the delightful kulcha. This Indian flatbread, made from refined flour (maida), is traditionally baked to perfection in a tandoor. However, even without a tandoor, you can make delicious kulchas at home on a pan.

    From plain kulchas to Amritsari varieties, these breads are always impressive. One popular version is Aloo Kulcha, which is stuffed with spiced mashed potatoes. It pairs beautifully with pickle, chutney, curry, or even vegetables. However, many people struggle to achieve the perfect Aloo Kulcha at home. If you’ve faced this challenge, we’ve got you covered! Here are 6 easy tips to help you make soft, flavorful Aloo Kulchas like a pro.

    Also Read: Amritsari Kulcha, Butter Garlic Naan Rank Among World’s Top Five Breads

    Here Are Some Easy Tips to Make Aloo Kulcha:

    1. Prepare the Dough

    To begin, prepare the dough by combining flour, sugar, salt, curd, and baking soda in a bowl. Mix well, then slowly add lukewarm water to knead a soft, smooth dough.

    2. Let the Dough Rest

    Once the dough is ready, it’s crucial to let it rest. Resting the dough enhances elasticity, making it easier to roll without cracking. Allow the dough to rest for at least 30 minutes.

    3. Keep It Covered with a Wet Cloth

    Always cover the dough with a damp cloth while it rests. Lightly oil the surface of the dough, then cover it with a wet cloth to prevent it from drying out.

    4. Prepare the Stuffing

    For the stuffing, take boiled potatoes and mash them thoroughly. Ensure there are no lumps, as poorly mashed potatoes can tear the kulcha while rolling.

    5. Add Spices

    Enhance the flavour of your Aloo Kulcha stuffing by adding spices. Mix mashed potatoes with finely chopped green chillies, onions, pomegranate seeds, carom seeds (ajwain), roasted cumin powder, and salt to taste. Blend everything well and set it aside.

    6. Make the Kulcha

    Divide the dough into equal portions and roll them into balls. Cover the balls with a cloth. Take one ball, roll it slightly, and place the potato stuffing in the centre. Fold the edges to seal and roll again. Sprinkle chopped coriander and black sesame seeds on top, then roll lightly to press them in.

    Heat a pan and lightly apply water to one side of the kulcha. Place it on the pan with the water-coated side facing down. Cook for a few seconds, then flip and cook the other side directly on the flame for a charred effect. Alternatively, cook on a medium heat using the pan.

    Brush the hot kulcha with butter and serve it alongside your favourite curry or vegetable.

    The next time you make Aloo Kulcha, follow these tips to achieve restaurant-style perfection at home!

    Source link

  • Beginner Cook Or A Bachelor – Everyone Can Make Perfect Chicken Curry With These Tips

    Beginner Cook Or A Bachelor – Everyone Can Make Perfect Chicken Curry With These Tips

    Cooking is an art that demands precision and technique. It can seem daunting, especially if you’re a bachelor or stepping into the kitchen for the first time. But fear not because traditional Indian food offers a treasure trove of easy and delectable Indian recipes, whether you’re a vegetarian or a meat enthusiast. In a matter of minutes, you can whip up classic Indian dishes like pulao, dal, vegetable curries, and chicken curry, all in the comfort of your home. Just remember to be patient and follow each step carefully.

    Also Read: 5 Surprising Health Benefits Of Adding White Butter To Your Diet – And How To Make It

    Exploring the World of Indian Food:

    Indian food is a rich tapestry of flavours, and within it, you’ll discover a myriad of straightforward recipes that don’t require culinary expertise. Take, for example, the humble chicken curry. While many traditional Indian recipes call for an array of spices and intricate cooking techniques, this chicken curry keeps it simple without compromising on taste. Even novice cooks can master it with ease.

    Also Read: Can’t Decide Between Butter Paneer And Shahi Paneer? 5 Factors To Help You Choose

    In a rush? Can’t cook?

    Order from

    Essential Tips To Make Chicken Curry:

    Before we dive into the recipe, here are some essential tips to ensure your chicken curry is a success:

    Prep Smart: Begin by washing the chicken and allowing it to drain in a strainer. This prevents splatters when it hits the hot oil.

    Organized Chaos: Prepare all your spices and ingredients in advance and lay them out on your kitchen counter. This will help you stay on top of things as you cook.

    Golden Onions: Once your onions turn a beautiful golden hue, introduce the ginger and garlic paste. These two ingredients are the aromatic foundation of your curry.

    Tame the Chicken: Give the chicken pieces a good fry to eliminate any raw odours. This step is crucial for a mouthwatering result.

    Ghee or Oil: You have the choice of using ghee, oil, or a combination of both for your chicken curry.

    Cooking Methods: This chicken curry can be prepared in either a pan or a pressure cooker. If you opt for the pressure cooker method, let it whistle only twice, and make sure to release all the pressure before opening the lid.

    Indulge in this simple and delicious chicken curry, whether paired with rice or roti. Give this recipe a go, and you’ll be thanking us later.

    Happy Cooking!

    About PayalFood in the mind, Bollywood in the heart – these two things often shimmer in Payal’s writing. Besides penning thoughts, Payal enjoys a playful tango with new and delicious recipes. Roaming around is her jam; whether catching up on the latest flicks or grooving to the beat, Payal knows how to keep her empty moments brimming with flavour and rhythm.

    Source link

  • Tomato Pappu: This Andhra Recipe Is Perfect To Add Tangy Twist To Your Dal

    Tomato Pappu: This Andhra Recipe Is Perfect To Add Tangy Twist To Your Dal

    If there is one comforting meal common in all Indian households, it has to be dal. With its soothing flavours, versatile recipes, and comforting feel on the palate, dal is one of the most-cooked dishes in the country. From dal tadka to dal makhani, it is the protein content and undying love for dal that has made it a staple in our diet. Since our favourite dal is enough to complete a quick and easy meal, we thought, why not bring you a delicious dal recipe that could become your next go-to meal? This recipe hails from the kitchens of Andhra Pradesh and is comforting, tangy, and extremely delicious. It is Andhra-style tomato pappu dal! This dish is perfect for your everyday meals and adds a tangy twist with its tomato content. So, are you ready to learn how to make this dish? Roll up your sleeves and read on.

    Also Read: 8 Traditional Snacks from Andhra Pradesh that You Will Want to Try this Monsoon

    Add image caption here

    Photo: iStock

    What Is Tomato Pappu?

    In Telugu, “Pappu” translates to dal (lentils). This Andhra-style tomato pappu recipe is a protein-rich dish packed with the tanginess of tomatoes and other staple ingredients. This recipe stands out for its simplicity and unique taste. Plus, it is extremely versatile — you can make multiple variations of it at home using your favourite vegetables or leafy greens. Typically, pappu is made with toor dal, and there are several variations of it. However, tomato pappu is the classic recipe that finds its way into almost every Andhra household.

    What Can You Pair with Tomato Pappu?

    Just like dal, this recipe is also a staple in Andhra homes. You can pair this delicious pappu with jeera rice, steamed rice, or hot mango pickle to make it a wholesome meal. It also pairs beautifully with stir-fried vegetables. To experiment with the flavours, you can add different variations of lentils to the recipe, like moong or masoor, and make it your own.

    Add image caption here

    Photo: iStock

    How to Make Andhra Tomato Pappu | Tomato Pappu Dal Recipe

    Making this delicious tomato pappu is extremely easy. This recipe was shared on Instagram by @chaispicekitchen. To make it:

    1. Prepare the Dal

    Take one cup of toor or arhar dal and wash it properly. Cover and soak the dal for 30 minutes to soften it. Once soaked, transfer the dal to a pressure cooker along with curry leaves, green chillies, onion, tomato, turmeric, chilli powder, salt, and water. Pressure cook for 4-5 whistles. Let the steam escape naturally.

    2. Prepare the Tempering

    In a tempering pan, heat the ghee. Add mustard seeds, cumin seeds, hing (asafoetida), curry leaves, dry red chilli, and crushed garlic. Mix well for 15 seconds and let the ingredients temper.

    3. Combine Ingredients

    In the same pan, add the cooked dal and mix everything together. Mash the dal slightly and let it simmer for a minute. Garnish with coriander leaves and serve hot!

    Pro Tip:

    To enhance its taste and tanginess, you can even add a dash of tamarind extract to your homemade pappu and tantalise your taste buds.

    Watch the full video below:

    Also Read:Andhra Chilli Chicken: A Fiery Chicken Recipe From South India That Spells Indulgence

    Will you try this Andhra-style tomato pappu at home? Let us know in the comments below.


    Source link

  • Love Sweet Dalia? These 5 Simple Tips Will Give You That Perfect Creamy Bowl Every Time

    Love Sweet Dalia? These 5 Simple Tips Will Give You That Perfect Creamy Bowl Every Time

    Dalia (porridge) is that one ingredient everyone loves to have in their kitchen. It’s light, super nutritious, and makes for a wholesome meal. Packed with iron, fibre, and antioxidants, Dalia is great for your immune system and a go-to for fitness lovers everywhere. Whether you’re looking to shed some extra weight or just enjoy a comforting dish, Dalia fits the bill perfectly. You can whip it up in a savoury version with lentils and veggies or go the sweet route with milk. But here’s the thing – making the perfect sweet Dalia can be tricky. A lot of us end up with a bowl that’s too runny, lumpy, or just not creamy enough. If you’ve faced this struggle, don’t worry! These five easy tips will have your sweet Dalia turning out spot-on every single time.

    Also Read: Dalia For Weight Loss: 5 Recipes That Are Healthy And Yummy

    Here Are Tips to Make Sweet Dalia That’s Always On Point:

    1. Roast the Dalia Like a Pro

    The secret to flavourful Dalia lies in roasting it well before cooking. Take the required amount of Dalia in a pan and dry roast it until you get that nutty aroma. Want to elevate the flavour? Add a little ghee while roasting. Trust us, this simple step makes a world of difference to the taste.

    2. Bring Out the Pressure Cooker

    Making Dalia in an open pan? That’s where it might go wrong. Dalia needs to cook evenly, and a pressure cooker is your best friend for this. Cooking it in a pressure cooker ensures it softens perfectly and also saves you a lot of time.

    3. Measure That Water

    Getting the water-to-Dalia ratio right is key. Too much water? It’ll spill out of the pressure cooker when the whistle blows. Add just enough water to cook the Dalia, and after two whistles, reduce the heat to low. Let it cook for a bit before switching off the flame.

    4. Milk at the Right Moment

    Here’s a pro tip: don’t just pour cold milk straight from the fridge into your Dalia. Once you release the pressure from the cooker, give the Dalia a stir and add lukewarm milk. Turn the gas on again and let it blend smoothly. Cold milk slows down the cooking process and can mess with the texture.

    5. Sweeten and Cream It Up

    Once the milk blends in, bring the Dalia to a boil. Now, add sugar as per your taste and let it simmer on low heat. This step is what gives your Dalia that creamy, rich texture. Feeling fancy? Toss in some finely chopped almonds or cashews for an extra dose of flavour and nutrition.

    And there you have it – perfect sweet Dalia every single time! Whether it’s for breakfast, a post-workout meal, or a light dinner, this recipe will never fail you. So, try these tips the next time you’re making sweet Dalia and watch your family ask for seconds.

    Source link

  • Quick And Easy Banana Bread Recipe – Perfect For Busy Mornings

    Quick And Easy Banana Bread Recipe – Perfect For Busy Mornings

    It is no secret that desserts somehow make us incredibly happy. Be it a slice of your favourite cheesecake, a gooey brownie or a crispy waffle topped with maple syrup and fruits, these sweet delights have the power to brighten our mood even on the dreariest of days. One such sweet treat that many consider their comfort food is banana bread. Super soft, spongy and moist, it makes for a perfect tea-time snack or just when you want to satisfy your sweet cravings. The best part about banana bread is that it is one of the easiest desserts to make. Here we bring you an even easier version of it that is made using just three ingredients. 

    Also read: How To Know If Ripe Bananas Are Good To Eat? Tips Inside

    If you’re looking for a quick fix to your sweet cravings, then you have to try this banana bread! To make this bread, you only need bananas, condensed milk, maida and that’s it! No fancy baking equipment is required. This recipe is also a great way of making something delicious from the leftover bananas lying in your kitchen. You could also add in some walnuts if you wish to add more texture to the bread. We are sure your kids will absolutely love this bread! So, without further ado, let’s learn how to make it.

    2l5d7ljo

    How To Make 3-Ingredient Banana Bread | Banana Bread Recipe

    To begin with, first, add mashed bananas and condensed milk to a large bowl. Mix well until everything is combined together. Now, sift maida into the bowl and mix again. (Make sure there are no lumps in the batter). Grease a loaf pan and line it with parchment paper. 

    In a rush? Can’t cook?

    Order from

    Also read: Banana Bread Muffins – The Latest Viral Recipe You Should Try Today

    Gently pour the batter into it. Bake at 180 degrees C for around 25-30 minutes. Once done, allow it to cool for some time before serving. Cut it into slices and enjoy! Banana bread is ready!

    Click here for the step-by-step recipe for banana bread.

    Sounds easy, right? Try out this delicious recipe at home and let us know how you liked its taste in the comments section below. Happy Baking!

    Disclosure: This article may contain links to third-party websites or resources. However, this does not affect the integrity of the content, and all recommendations and views are based on our independent research and judgment.

    About Vaishali KapilaVaishali finds comfort in eating parathas and rajma chawal but is equally enthusiastic about exploring different cuisines. When she’s not eating or baking, you can often find her curled up on the couch watching her favourite TV show – FRIENDS.

    Source link

  • 5 Tips To Make Perfect South Indian Coconut Chicken Curry At Home

    5 Tips To Make Perfect South Indian Coconut Chicken Curry At Home

    South Indian food never lets us down, right? From the light and fluffy upma for breakfast to the delicious, comforting curries for lunch and dinner, South Indian cuisine has something for everyone. The region offers a range of veg and non-veg dishes, each with its own unique twist. When it comes to non-vegetarian curries, every part of South India has its own version of chicken curry-like Andhra-style, Chettinad, and so many more. The list of options is endless! Today, we’re adding one more to your list: a mouthwatering, healthy South Indian Coconut Chicken Curry recipe. So, if you want to bring those authentic South Indian flavours into your kitchen, this one’s for you! But before you get cooking, here are some essential tips you need to know to make it just right. Let’s dive in!

    1. Marinate Chicken Properly

    For any chicken curry to shine, marinating the chicken is key. Without it, the curry just won’t hit the same. For the South Indian Coconut Chicken Curry, start by placing the chicken in a bowl and washing it thoroughly. Then, marinate it with curd, ginger-garlic paste, turmeric, and salt for at least 30 minutes. You can adjust the time based on your schedule, but make sure you don’t skip this step! A solid 30-minute marinate is what makes the chicken tender and juicy.

    2. Use Curry Leaves and Mustard Seeds

    This South Indian curry gets its iconic flavour from mustard seeds and curry leaves. To get the best flavour, cook them in coconut oil. The temperature of the oil matters, so be sure to heat it right. Add the mustard seeds and wait for them to crackle. Once they do, throw in the curry leaves and roast them for a few seconds to let that awesome aroma fill the oil.

    3. Add Tamarind In The Right Quantity

    The flavour of the curry really depends on how you balance the ingredients. And tamarind pulp? It’s a tricky one. Too much, and your curry will be too sour, so you have to get the balance just right. For 1 kg of chicken, use 2 teaspoons of tamarind pulp. If you’re cooking with half a kg of chicken, one tablespoon is perfect.

    4. Cook It On Low Flame

    Low and slow is the way to go when cooking this curry. Simmering on a low flame allows the spices to blend together beautifully, which enhances the flavour of the gravy. Plus, it keeps the spices from burning. Cooking on a low flame also makes the chicken super tender. If you cook it on high heat, the meat might turn tough and dry. Let the chicken cook in its own juices for the best taste!

    5. Right Time To Add Coconut Milk

    Coconut milk is what makes this curry creamy and dreamy. Homemade coconut milk is your best bet for the richest flavour, but if you’re using packaged coconut milk, make sure it’s free of artificial flavours or preservatives. Always add coconut milk to the curry on low heat, and cook it gently. This keeps the milk from curdling and ensures your curry stays smooth and velvety.

    Click here for the full recipe of South Indian Coconut Curry. Keep these tips in mind next time you make this chicken curry, and you’ll be all set to impress!

    Source link