hacklink hack forum hacklink film izle hacklink marsbahisizmir escortsahabetpornJojobet

Tag: Recipe

  • Moringa Coconut Rice: This Quick And Easy Leftover Rice Recipe For A Wholesome Lunch

    Moringa Coconut Rice: This Quick And Easy Leftover Rice Recipe For A Wholesome Lunch

    Winter brings with it chilly weather and a craving for warm, hearty dishes that comfort our souls. Be it a steaming bowl of soup, a rich curry, or a cosy one-pot meal – there’s something about warm dishes that feel like a hug. But what if you could whip up something easy, wholesome and packed with flavours? Another bonus? It’s made with leftover rice. So, roll up your sleeves and get ready to make delicious Moringa Coconut Rice. This vibrant and delicious recipe is packed with the nutty flavour and nutritional power of coconut and moringa. So, what are you waiting for? Let’s learn how you can make this simple and tasty rice recipe in just 10 minutes.

    Also Read:Did You Know? This Easy Trick Makes Leftover Rice As Good As New!
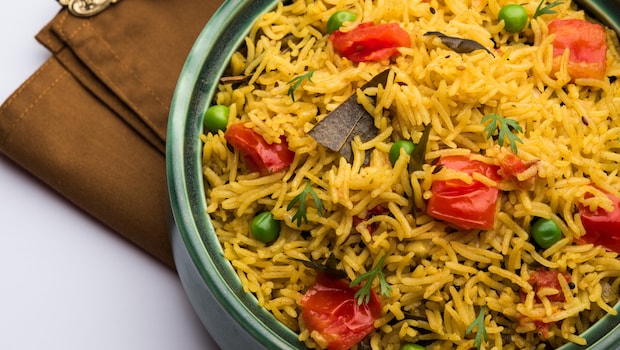
    Add image caption here

    Photo: iStock

    What Makes Moringa Coconut Rice a Must-Have? 

    Moringa coconut rice is your go-to dish for a quick and satisfying meal. It’s super simple to prepare, requires minimal kitchen ingredients, and only a few simple steps. The best part is that this recipe uses leftover rice from the fridge, minimising food waste and maximising flavour. The subtle aroma of coconut paired with moringa’s earthy tones creates a dish loved by kids and adults alike. Whether you’re short on time or planning a wholesome lunchbox, this recipe is perfect for you.

    How Does Moringa Benefit Your Body? 

    Moringa, the star ingredient of this dish, is a powerhouse of nutrition, making it a must-have during winter.

    1. Packed with Vitamins Humble moringa is packed with vitamins A, C, and calcium, boosting immunity and bone health.

    2. High in Antioxidants Moringa helps combat free radicals, which in turn reduces inflammation and oxidative stress in your body.

    3. Supports Digestion Since moringa is high in fibre, it helps keep your digestive system smooth and happy, supporting gut health.

    4. Promotes Healthy Skin Thanks to its antioxidant, anti-inflammatory, and antiseptic properties, moringa leaves are perfect for achieving smooth, glowing skin.

    Add image caption here

    Photo: Pexels

    How to Make Moringa Coconut Rice | Coconut Rice Recipes 

    Making moringa coconut rice at home is pretty easy. This recipe was shared on Instagram by content creator and chef @chefvinnyshukla. To make it:

    1. Prepare Tempering: In a pan, heat some coconut oil. Once hot, add mustard seeds and let them splutter. Add one tablespoon of chana dal and one tablespoon of urad dal, and let it brown.

    2. Cook Moringa: Once done, add grated ginger, green chillies, red chillies, hing, and one cup of fresh moringa. Add salt to the ingredients and sauté until the mixture shrinks and loses its rawness.

    3. Combine Ingredients: In the same pan, add grated coconut, rice, and salt. Give it a good mix and check for seasoning. Garnish with coriander leaves and enjoy!

    Watch the full video below:

    Also Read: Rice It Up! 4 Incredible Health Benefits Of Kanji Or Rice Water

    Will you try this moringa coconut rice recipe at home? Let us know in the comments below.


    Source link

  • Quick And Easy Banana Bread Recipe – Perfect For Busy Mornings

    Quick And Easy Banana Bread Recipe – Perfect For Busy Mornings

    It is no secret that desserts somehow make us incredibly happy. Be it a slice of your favourite cheesecake, a gooey brownie or a crispy waffle topped with maple syrup and fruits, these sweet delights have the power to brighten our mood even on the dreariest of days. One such sweet treat that many consider their comfort food is banana bread. Super soft, spongy and moist, it makes for a perfect tea-time snack or just when you want to satisfy your sweet cravings. The best part about banana bread is that it is one of the easiest desserts to make. Here we bring you an even easier version of it that is made using just three ingredients. 

    Also read: How To Know If Ripe Bananas Are Good To Eat? Tips Inside

    If you’re looking for a quick fix to your sweet cravings, then you have to try this banana bread! To make this bread, you only need bananas, condensed milk, maida and that’s it! No fancy baking equipment is required. This recipe is also a great way of making something delicious from the leftover bananas lying in your kitchen. You could also add in some walnuts if you wish to add more texture to the bread. We are sure your kids will absolutely love this bread! So, without further ado, let’s learn how to make it.

    2l5d7ljo

    How To Make 3-Ingredient Banana Bread | Banana Bread Recipe

    To begin with, first, add mashed bananas and condensed milk to a large bowl. Mix well until everything is combined together. Now, sift maida into the bowl and mix again. (Make sure there are no lumps in the batter). Grease a loaf pan and line it with parchment paper. 

    In a rush? Can’t cook?

    Order from

    Also read: Banana Bread Muffins – The Latest Viral Recipe You Should Try Today

    Gently pour the batter into it. Bake at 180 degrees C for around 25-30 minutes. Once done, allow it to cool for some time before serving. Cut it into slices and enjoy! Banana bread is ready!

    Click here for the step-by-step recipe for banana bread.

    Sounds easy, right? Try out this delicious recipe at home and let us know how you liked its taste in the comments section below. Happy Baking!

    Disclosure: This article may contain links to third-party websites or resources. However, this does not affect the integrity of the content, and all recommendations and views are based on our independent research and judgment.

    About Vaishali KapilaVaishali finds comfort in eating parathas and rajma chawal but is equally enthusiastic about exploring different cuisines. When she’s not eating or baking, you can often find her curled up on the couch watching her favourite TV show – FRIENDS.

    Source link

  • Lemon Coriander Maggi: A Quick And Tasty Recipe Youll Keep Coming Back To

    Lemon Coriander Maggi: A Quick And Tasty Recipe Youll Keep Coming Back To

    If there is one food that defines comfort at its best, it has to be Maggi. It’s something we’ve all grown up eating and have fond memories of. Whether in times of sadness or happiness, this snack has always been by our side, and we still can’t get enough of it. Don’t you agree? While classic Maggi is timeless, there are now countless other Maggi recipes out there. Peri Peri Maggi, Cheese Maggi, Schezwan Maggi, and Paneer Maggi are just some examples. Adding to the list, we bring you another delightful version that will win you over with the first bite – Lemon Coriander Maggi. The recipe for this Maggi was shared by the Instagram page @ohcheatday.
    Also Read: Craving Maggi? Try These 5 Mouth-Watering Recipes That Are Perfect For Lazy Days

    Add image caption here

    Photo Credit: iStock

    What Makes Lemon Coriander Maggi A Must-Try?

    This lemon coriander Maggi is an ideal option for anyone looking to try something different. Easy to make and packed with flavour, this Maggi recipe offers a delightful change from the regular version. Whether you enjoy it for lunch, dinner, or as an evening snack, it is sure to impress with its delicious taste.

    How To Make Lemon Coriander Maggi At Home | Lemon Coriander Maggi Recipe

    Making lemon coriander maggi at home is incredibly simple. All you need are a few basic ingredients and under 10 minutes of your time. Add chopped coriander leaves, garlic cloves, onions, Maggi masala, soy sauce, hot sauce, red chilli sauce, boiled Maggi water, hot oil, and lemon juice to a pan. Give it a good mix and add the boiled Maggi noodles. Add salt to taste if needed. That’s it-your lemon coriander Maggi is now ready to be savoured!

    Watch the complete video below:

    3 Tips To Make Perfect Lemon Coriander Maggi:

    1. Use Fresh Coriander

    Coriander leaves are the key ingredient in this recipe, so make sure the ones you’re using are fresh. This ensures there is no compromise on flavour.

    2. Be Generous With Lemon Juice

    Lemon is what gives this Maggi its distinct flavour. Be generous while adding it, or it may lack the tangy flavour you’re looking for.

    3. Allow The Maggi To Simmer

    Let the Maggi noodles simmer with the other ingredients for a few minutes. This will help infuse the flavours better, giving you the perfect results.
    Also Read: Rasam Maggi: This Delicious Mix Of Spicy Masala And Instant Noodles Is A Must-Try

    So, the next time you’re craving Maggi, try making this delicious lemon coriander Maggi. It’s simple, flavourful, and oh-so addictive!


    Source link

  • How To Make Healthy Green Chana Pulao – A Must-Try Recipe This Winter!

    How To Make Healthy Green Chana Pulao – A Must-Try Recipe This Winter!

    Pulao is one of those comforting dishes we all crave during winter. With the season’s bounty of fresh vegetables, you can whip up countless delicious dishes, and pulao is definitely one of them. It’s a one-pot wonder made with simple whole spices and fresh veggies, delivering flavours that feel like a warm hug. The best part? It’s super quick to make and doesn’t require a long list of ingredients. Plus, it’s a complete meal on its own-no need for any side sabzi or curry.

    Also Read: Bored With Pulao? Try This Cosy One-Pot Rasam Rice Instead

    While matar pulao, gobhi pulao, and mixed veg pulao are winter staples, let’s give them a fresh twist. This time, we’re adding green gram pulao (aka chholia pulao) to your recipe list. Chholia, or green gram, is a winter-exclusive ingredient packed with protein, fibre, vitamins, and minerals. Bonus: it’s great for weight loss, thanks to its protein content. So, why not make the most of this seasonal gem? Trust us, once you try this recipe, it’s going to be your winter favourite.

    If you’ve never experimented with green gram pulao before, now’s the time! It’s not just delicious; it’s also packed with nutrients, making it perfect for both lunch and dinner. Pair it with some bathua raita, tangy chutney, or your go-to pickle, and you’ve got a meal that’s winter perfection on a plate.

    Here Are Tips For Making the Perfect Green Chana Pulao

    1. Choose the Right Rice:

    Basmati rice works best for this recipe, giving the pulao its signature flavour and texture. Make sure to soak the rice for about 20 minutes before cooking. If you don’t have basmati, regular rice will work too!

    2. Cooking Green Gram:

    Unlike black gram, green gram doesn’t need hours of soaking. It cooks quickly, taking just 2-3 whistles in a pressure cooker.

    3. Don’t Skip Whole Spices:

    Cardamom (green and black), cloves, and bay leaves are key to making the pulao aromatic and flavourful.

    Ingredients for Green Chana Pulao

    2 cups basmati rice

    1 cup green gram (chholia)

    1 onion (chopped)

    1 tomato (chopped)

    1 tsp cumin seeds

    5 cloves

    2 small cardamoms

    1 big cardamom

    2 bay leaves

    1/2 tsp red chili powder

    1/2 tsp turmeric powder

    1 tsp biryani masala

    3 tbsp oil

    Salt to taste

    Step-by-Step Recipe Of Green Chana Pulao | How To Make Green Chana Pulao:

    Heat oil in a pressure cooker. Add cumin seeds and all the whole spices (cardamom, cloves, and bay leaves).

    Toss in the chopped onion and sauté until golden brown.

    Add the tomatoes and cook until they turn soft and mushy.

    Mix in the green gram, followed by red chili powder, turmeric, coriander, and biryani masala. Stir well.

    Add the soaked basmati rice and gently combine everything. Pour in one glass of water (adjust based on the rice type).

    Season with salt, lemon juice, and fresh coriander. For an extra flavour boost, you can add a spoonful of desi ghee at this stage.

    Close the lid of the pressure cooker. Cook for one whistle, then reduce the flame and let it simmer for 2-3 minutes.

    Turn off the heat and allow the pressure to release naturally. Once done, fluff up the pulao with a fork and transfer it to a serving bowl.

    Serve hot with your favourite side dish, and you’re good to go!

    If you’re tired of the same old recipes, this winter-special pulao is just what you need to shake things up. It’s healthy, easy to make, and loaded with flavour. Give it a shot – you’ll thank us later!

    Source link

  • Viral Chia Seed Wraps: The Guilt-Free Recipe You Didnt Know You Needed

    Viral Chia Seed Wraps: The Guilt-Free Recipe You Didnt Know You Needed

    Chia seeds have gained massive popularity over the years due to their impressive nutritional profile. They are tiny but mighty, packed with protein, fibre, and essential nutrients. While many people enjoy chia seeds in smoothies or puddings, there’s a more creative way to incorporate these superfoods into your meals-by turning them into a guilt-free wrap. This unique chia seed wrap recipe combines the power of chia with the versatility of a wrap, offering a nutritious and tasty alternative to traditional bread or tortillas. The recipe was posted on the Instagram handle ‘_sunchef’ and went viral with more than a million views. Let’s see how you can make your own chia seed wrap and why it’s an excellent addition to your diet.

    How To Make Chia Seeds Wrap I Chia Seeds Wrap Recipe

    To make the chia seed wrap, start by mixing chia seeds, a pinch of salt, and water in a glass. Stir well to ensure everything is combined, and then let the mixture sit in the fridge for a couple of hours (up to 24 hours) until it reaches a gel-like consistency. This gel forms because chia seeds absorb water, creating a thick texture that can easily be spread out into a wrap.

    Once the chia mixture is ready, heat a pan with a little olive oil. Pour the chia gel into the pan and use a spatula to spread it evenly into a thin layer. Let it cook for about 10-15 minutes, allowing the water to evaporate and the wrap to set. Once it starts to firm up, flip the wrap over and cook the other side for a couple of minutes until both sides are lightly golden.

    Now, the fun part: adding your toppings! You can choose anything you like sliced turkey, fresh mozzarella or some microgreens for a light, refreshing crunch. The wrap is not only customizable but also a perfect way to enjoy a low-carb, high-protein, and high-fibre meal.

    Watch the complete recipe video of chia seed wrap here:

    The Benefits of Chia Seeds
    Chia seeds are a nutritional powerhouse that can significantly boost your overall health. Here are some of the top benefits of incorporating chia seeds into your diet:

    High in Protein: Chia seeds are an excellent plant-based source of protein. With approximately 4 grams of protein per 2 tablespoons, they provide a significant protein boost for vegetarians and vegans, helping to support muscle growth and repair.

    Rich in Fiber: Chia seeds are packed with fibre, which supports digestion and helps regulate blood sugar levels. A high-fibre diet also aids in maintaining a healthy weight by keeping you full for longer, making chia seed wraps an ideal choice for a filling yet light meal.

    Omega-3 Fatty Acids: Chia seeds are an abundant source of omega-3 fatty acids, which are essential for heart health. These healthy fats help reduce inflammation, lower cholesterol, and promote overall cardiovascular health.

    Packed with Micronutrients: Chia seeds are loaded with important vitamins and minerals, including calcium, magnesium, and iron. These micronutrients support bone health, muscle function, and overall well-being.

    Supports Hydration: Chia seeds have the unique ability to absorb up to 10 times their weight in water. This makes them great for promoting hydration, especially when mixed with water to form a gel. Consuming chia seeds can help keep your body hydrated and improve skin health.

    Gluten-Free: Chia seeds are naturally gluten-free, making them a great option for those with gluten sensitivities or celiac disease. They can easily replace traditional wheat-based wraps, providing a healthier, gluten-free alternative.

    Why Choose Chia Seed Wraps?
    The chia seed wrap is an ideal option for anyone looking to make healthier food choices without compromising on taste or texture. High in protein and fibre, this wrap offers a filling and nutritious alternative to traditional wraps or tortillas. Whether you’re enjoying it for lunch, dinner, or as a snack, the chia seed wrap can be tailored to suit your taste with a variety of toppings, making it a versatile option for any meal.

    So, next time you’re looking for a unique and healthy way to consume chia seeds, try making a chia seed wrap! It’s a simple, delicious, and nutritious way to enjoy this superfood in a new form.
     

    Source link

  • Badaga Chicken Curry Recipe From Nilgiris Will Transport You To The Gorgeous Region Of Tamil Nadu

    Badaga Chicken Curry Recipe From Nilgiris Will Transport You To The Gorgeous Region Of Tamil Nadu

    My first brush with the distinctive cuisine of the Badgas was in 2015. It was a chance experience at the Vivanta Coimbatore. I had stopped to check out their dinner buffet and discovered a specially curated Badaga promotion that was part of that buffet. Those flavours have stayed with me ever since, especially the Badaga Kappu Koi Udhakka (Chicken Curry) that’s powered by their inimitable spice powder (Badugaru udhakka Maas hudi). The term Badaga or Vadugan refers to a group of people who moved to the Nilgiris region (in and around Ooty or Udhagamandalam) about three to four centuries ago from the Mysore region in Karnataka.

    Also Read: 10 Wonderful Dishes from Tamil Nadu You Didn’t Know About

    The name refers to the direction they came from (North). They settled in around 400 villages (or hattis) around the region. They have a unique culture, language (similar to Kannada) and a very distinctive cuisine. My interactions with the culinary team at the Vivanta threw up some interesting insights about the cuisine. The cuisine has developed from locally sourced ingredients, the Badagas have been predominantly a farming community and grow crops like potato, millets, barley and carrots in the Nilgiris.  

    The Badaga diet predominantly revolves around millets like finger millet (ragi) and wheat which are consumed more than rice. It’s been almost a decade since I checked out some of the Badaga favourites like the Bathalu (crispy sun-dried potatoes) at this food promotion. The cuisine is yet to make its way into restaurant menus even in cities like Coimbatore which is close to Ooty and home to a large number of Badagas. Some of the quintessential Badaga dishes include Hachchike (a sweet made with millets) and a delicious mutton curry. Mud pots are still extensively used in many Badaga homes to this day and meals are still served on bronze plates for their unique flavours. 

    Black Pepper Chicken Curry

    Chicken Curry is a popular dish in Indian cuisine. Image Credit: iStock

    One of the standout Badaga dishes is the Badaga Kappu Koi Udhakka or chicken curry. The key to dish (see recipe) is the flavourful spice powder. You can try this recipe at home: 

    Badaga Kappu Koi Udhakka – Chicken Curry Recipe

    Ingredients:

    • 1 kg Chicken- cut into pieces 
    • 2 cups Shallots 
    • 3-4 tbsp Badaga chicken masala powder (see recipe below)
    • 1/4 cup oil 
    • 2 tbsp ghee 
    • 3 cups water to cook 
    • Seasoned mud pot to cook (optional)
    • Salt as required 

    Method:

    1. Heat oil in a mud pot or pan and add the shallots. Fry on a low flame for 15-20 mins till the shallots have turned to a very dark brown. The inside of the shallots needs to get well cooked and caramelised. 
    2. Add the Badaga masala and salt and cook for 3 to 4 minutes on a low flame. Do not burn the masala. Set the flame on low and continue to cook. 
    3. Grind the shallot spices into a paste mix into the chicken and marinate for 30 mins.
    4. Heat the ghee in the same mud pot. Add the marinated chicken and fry on a low flame for 5 minutes till the spices smell aromatic. Add water and bring to a boil.
    5. Simmer for 30 minutes. This gives enough time for the spices to flavour the chicken. 
    6. Add water if required, and make sure the chicken curry doesn’t dry out. Taste and adjust salt as required.
    7. When the chicken is cooked remove from the heat. Make sure it’s not too dry and there’s enough gravy. 
    8. Serve it with hot steamed rice or dosa. The curry should thicken once it’s cooked.

    Also Read: Foodie’s Guide To Tamil Nadu: 5 Popular Street Foods You Must Try

    Recipe For the Badaga Masala Powder

    Ingredients:

    100 gm dry red chilli 
    200 gm coriander seeds
    50 gm cumin seeds
    4 tbsp fennel seeds
    1/4 cup raw rice
    1 tbsp mustard seeds 

    Method:

    1. Dry roast all the ingredients separately. 
    2. Let them cool completely. Once it cools, add all the ingredients into a mixer jar and grind it to a fine powder. The colour of the masala powder should be dark brown. 
    3. Transfer this ground masala powder to a piece of paper. Spread and mix it well.
    4. Store it in an air-tight container, once the masala powder is completely cool and dry.
       

    About Ashwin RajagopalanI am the proverbial slashie – a content architect, writer, speaker and cultural intelligence coach. School lunch boxes are usually the beginning of our culinary discoveries.That curiosity hasn’t waned. It’s only got stronger as I’ve explored culinary cultures, street food and fine dining restaurants across the world. I’ve discovered cultures and destinations through culinary motifs. I am equally passionate about writing on consumer tech and travel.

    Source link

  • How To Make Chilli Garlic Momos: A Quick Recipe For A Spicy Delight

    How To Make Chilli Garlic Momos: A Quick Recipe For A Spicy Delight

    Momos are the ultimate snack fix. Whether you like them steamed, tandoori, pan-fried, or fried, they hit the spot every single time. They have totally won our hearts, and honestly, we can’t get enough. Pair them with creamy mayo or fiery chutneys, and it’s a whole vibe. With the weekend right around the corner, why not treat yourself to something extra delicious? Forget the usual paneer or chicken momos – we are talking about momos dunked in a bold, chilli garlic sauce. And guess what? Instagram page @picklesandwine has the recipe that’ll have you drooling.
    Also Read: 5 Tips For Making Paneer Momos That Will Leave You Drooling From The First Bite

    Add image caption here

    Photo Credit: Getty

    Why Chilli Garlic Momos Are A Total Game-Changer

    Chilli garlic momos are not your regular dumplings. They’re next-level amazing, and you can make them with both veg and non-veg fillings. Here’s why you’ve got to try them:

    1. Super Easy To Make

    Think making momos is complicated? Nope! With this recipe, you’ll have them ready in just 15-20 minutes.

    2. Bursting With Flavours

    These momos are packed with sweet, spicy, and tangy goodness that’ll make every bite a party in your mouth.

    3. Perfect Party Snack

    Need a snack to wow your guests? Chilli garlic momos are the answer. They’re so good that everyone will ask you for the recipe.

    Pro Tips For Crispy, Perfectly Cooked Chilli Garlic Momos:

    These momos are pan-fried to golden perfection, but the trick is in the technique. Want them just right? Here’s how:

    • Keep the flame on low-medium for even cooking.
    • Wait until they turn that perfect golden brown shade.
    • Don’t overcrowd the pan; give your momos space to shine.

    How To Make Chilli Garlic Momos At Home

    Making chilli garlic momos is easier than you think! You’ll need just a few ingredients and less than 15 minutes. Here’s the breakdown:

    • Heat some oil in a pan and place the momos in it.
    • Once they’re golden at the bottom, add a splash of water and cover with a lid to steam.
    • After a few minutes, uncover and turn off the flame.
    • For the sauce, heat oil in another pan and add garlic, green chillies, schezwan chutney, soy sauce, red chilli sauce, vinegar, ketchup, and salt. Cook for a minute or two.
    • Toss in the pan-fried momos, mix well, and garnish with sesame seeds and spring onion greens.
    • Serve them hot, and watch them disappear!

    Also Read: Give Your Chicken Momos A Tandoori Twist With This Interesting Recipe

    Check out the full video here:

    Feeling hungry already? This is your sign to give this recipe a shot and make your weekend extra tasty! For more momo inspiration, click here.


    Source link

  • How To Make Batte Idli: An Age-Old Cloth Idli Recipe To Tantalize Your Taste Buds

    How To Make Batte Idli: An Age-Old Cloth Idli Recipe To Tantalize Your Taste Buds

    South Indian cuisine holds a special place in every food lover’s heart. From crispy dosas to spicy chutneys, the list is endless. The one at the top, however, is idli. These fluffy, steamed delights are not only easy to make but also incredibly versatile. Loved by kids and adults alike, idlis can be paired with anything from tangy chutneys to hearty sambar… or even a big tablespoon of ghee for a rich touch. If you like idlis in all shapes, sizes, and methods, then here’s the recipe for Batte Idli – an age-old method of steaming idlis on a wet cloth. You may have seen this trending on social media, and now it’s time to make it at home! Let’s learn how you can make these idlis in your kitchen.

    Also Read:Watch: How To Make Idli 65 – Give Your Leftover Idlis A Tantalising Twist With This Amazing Recipe

    idli

    Photo: iStock

    What Exactly Is Batte Idli?

    Batte Idli isn’t exactly a different variety of idli but rather a method of preparation. In Kannada, “batte” translates to a piece of cloth. Typically, idlis are prepared by greasing idli plates with oil before pouring in the batter. In this method, idli batter is poured directly onto a wet, clean cloth placed over a pan and steamed. The cloth adds a unique texture to the idlis while keeping them moist and soft for a long time. It’s a traditional method that adds a touch of authenticity to your idli-making process.

    How Is Batte Idli Different from Greased Idli?

    Although both batte idli and greased idli taste the same, the main difference lies in their texture and moisture retention. Batte idlis – which are steamed on a clean cloth – stay soft and moist even hours after steaming, making them perfect for prolonged use. In contrast, greased idlis tend to dry out more quickly. So, you can choose the technique based on your preference and convenience.

    Add image caption here

    Photo: iStock

    How to Make Batte Idli at Home | Batte Idli Recipe

    Making batte idli at home is pretty simple. This recipe was shared by digital content creator @finefettlecookerys. To make this, start by:

    1. Soaking Lentils

    Take one cup of broken rice, ½ cup urad dal, 1 tbsp fenugreek seeds, and ¼ cup poha. Wash and soak them in water for 3-4 hours.

    2. Make Batter

    Once soaked, blend the lentils coarsely. Make sure it becomes a thick batter. Add water if necessary. Let it ferment overnight.

    3. Prepare Idlis

    In a pan, add some water. Cover it with a cloth and add a few droplets of water over it. Gently add a ladleful of idli batter over the cloth and cover it with a lid. Let the steam cook the idli. Then gently remove the idli from the cloth, sprinkle some podi masala over it, and enjoy!

    Watch the full video below:

    Also Read:Feeling Lazy? Quickly Make Delicious Poha Idlis To Beat Your Mid-Day Hunger

    Will you try this batte idli recipe at home? Let us know in the comments below.


    Source link

  • Amla Kacchi Haldi Thecha: A Flavourful And Nutritious Recipe To Amp Up Your Winter Meals

    Amla Kacchi Haldi Thecha: A Flavourful And Nutritious Recipe To Amp Up Your Winter Meals

    Winter is finally here, bringing with it the bounty of fresh seasonal produce. You will find the market full of vibrant fruits and veggies. While there’s so much to explore, what better way to enjoy this chilly season than indulging in the goodness of amlas? Whether it’s in chutneys, pickles, or even refreshing juices, there is no shortage of ways to add this superfood to your diet. And if you are an amla enthusiast, we have another special recipe for you that will make your everyday meals 10x better – Amla Kachhi Haldi thecha. This simple yet delicious recipe doesn’t require any fancy ingredients and makes for an amazing addition to your winter diet. Want to know its benefits and recipe? Let’s find out!

    Also Read:Love Thecha? Why Not Make Some Crispy And Cheesy Thecha Rolls Out Of It

    Latest and Breaking News on NDTV

    Why You Shouldn’t Skip Eating Amla Kacchi Haldi Thecha This Winter

    Both amla and kacchi haldi are nutritious ingredients which when added to the diet, can do wonders for your body. Kacchi haldi (raw turmeric) is loaded with anti-inflammatory and antioxidant properties, which makes it an excellent ingredient for boosting immunity and keeping winter flu at bay. Amla, on the other hand, is a rich source of Vitamin C and is beneficial for your skin, digestion and overall health. Together, this thecha makes for a delicious and nutritious condiment that nourishes your body and taste buds in the most wholesome way.

    Can You Store Leftover Amla Kachhi Haldi Thecha?

    Absolutely! Amla Kacchi Haldi thecha can be stored for several days. Just transfer the leftover thecha to an airtight container and refrigerate them. The natural preservatives in amla and haldi can help retain their flavour and nutrition for up to a week. Whether spread on parathas or paired with piping hot dal-rice, this thecha recipe is perfect for every winter meal.

    Latest and Breaking News on NDTV

    How To Make Amla Kacchi Haldi Thecha | Amla Kacchi Haldi Thecha Recipe

    Making amla kacchi haldi thecha is pretty simple. You can make this thecha with simple ingredients from your pantry. To make this:

    1. Prepare Ingredients

    Take 150 grams of amla and cut it into small pieces. Deseed them. Then take fresh kacchi haldi and wash it properly. Cut it into small pieces and set aside.

    2. Cook Ingredients

    In a pan, heat some oil. Now add jeera and hing. Once they start to splutter, sprinkle some salt over it and cover. Let it cover on slow to medium flame until the amla is soft. Add a sprinkle of water if needed. Once soft, add fresh green chillies and peanuts into the mix. Cook for another 7-8 minutes.

    3. Pound It

    Once done, turn off the heat. Add a bunch of coriander leaves and mix everything. Let it cool down, transfer it to a mortar and pound it coarsely with a pestle. You can grind it in a mixer too. Top it up with lemon juice and serve!

    Watch the full video below:

    Also Read:How To Make Thecha Curd Rice: A Bowl Meal That’s Both Comforting And Flavourful

    Will you try this Amla Kacchi Haldi thecha at home? Let us know in the comments below.


    Source link

  • Nadru Kofta Recipe: A Simple Lotus Stem Curry That Will Leave You Asking For More

    Nadru Kofta Recipe: A Simple Lotus Stem Curry That Will Leave You Asking For More

    Whether it’s crispy, fried, or curried, Nadru – or lotus stem – is one vegetable that can be enjoyed in many ways. It has a crunchy texture and tastes somewhat sweet and juicy, making it super versatile in the culinary world. This vegetable is a hit in Kashmiri cuisine, with Nadru Yakhni being served on major occasions. While Nadru Yakhni has its own charm, why not give it a unique twist with simple ingredients from your pantry? Here, we bring you a delicious curry recipe featuring the flavors and goodness of lotus stem – Nadru Kofta! This recipe is simple, spicy, and so versatile that you can make it every day for your lunch meals without getting bored. Want to know how to make it? Let’s take a look at what’s required to prepare Nadru Kofta at home.

    Also Read: Aloo Kofta Recipe: Make This Velvety Veg Kofta For Mid-Week Indulgence

    Latest and Breaking News on NDTV

    What Is Nadru Kofta?

    Nadru Kofta is a delightful twist on Kashmir’s classic dish, Nadru Yakhni. This dish is perfect for when you’re craving a kofta curry with a healthy twist. The best part? It’s made with simple pantry ingredients and can be prepared in no time. It’s a great way to incorporate Nadru’s goodness into your routine while also taking a break from regular curries. Pair it with hot rotis and rice, and you’re all set to dig in!

    Is Nadru Kofta Healthy?

    Absolutely! Nadru Kofta is incredibly healthy. Here’s why:

    1. Digestive Benefits

    The flesh of lotus root is rich in dietary fiber, which helps maintain smooth and regular bowel movements. Nadru can reduce constipation while optimizing nutrient absorption through digestive and gastric juice secretion.

    2. Reduces Risk of Anemia

    Nadru is loaded with iron and copper, essential for red blood cell production. These nutrients help reduce the risk of anemia and improve blood circulation.

    3. Regulates Blood Pressure

    With significant levels of potassium, Nadru helps maintain fluid balance in the body. It relaxes blood vessels and reduces strain on the cardiovascular system.

    4. Provides Mental Clarity

    Lotus stem contains pyridoxine, a component of the vitamin B complex. It helps control irritability, headaches, and stress levels in the body.

    Mix breadcrumbs in your minced chicken and shape them into circles.

    Photo Credit: iStock

    How to Make Nadru Kofta | Nadru Kofta Recipe

    Making Nadru Kofta is straightforward. This recipe was shared on Instagram by content creator @princebchef. Here’s how to make it:

    1. Prepare Kofta Balls

    Grate the potato and Nadru stem together. Add chopped green chilies, coriander leaves, salt, garam masala, coriander powder, cumin powder, and besan. Mix well and shape the mixture into small balls.

    2. Fry the Balls

    Heat oil in a wok. Gently add the kofta balls and fry them until golden brown. Fry on medium heat to achieve the perfect crunch and color. Set aside.

    3. Prepare the Gravy

    In a pan, heat some desi ghee. Add whole spices like cumin, chili, and bay leaf. Once aromatic, add saunf powder, garam masala, turmeric, red chili powder, and salt. Stir well, then add fresh curd. Follow with water to adjust consistency.

    4. Assemble

    Add the fried kofta balls to the gravy and cook for 5-6 minutes to let them soak up the flavors. Garnish with chilli oil and serve!

    Can You Make Nadru Kofta Healthier?

    Yes, you can! Instead of deep-frying the balls, use an air fryer to bake them. This method retains the flavors of the vegetable and spices without the guilt of excess oil. You can also add cashew paste to the gravy for creaminess, eliminating the need for heavy cream.

    Watch the full video below:

    Also Read:Kashmiri Mutton Kofta, Malai Kofta Dum And 5 Other Non-Veg Kofta Recipes

    What’s your favorite way to eat Nadru? Let us know in the comments below!


    Source link