hacklink hack forum hacklink film izle hacklink marsbahisizmir escortsahabetpornJojobetcasibompadişahbetjojobet

Tag: Recipe

  • Want Perfectly Fluffy Pita Bread? Heres How To Make It At Home With An Easy Recipe

    Want Perfectly Fluffy Pita Bread? Heres How To Make It At Home With An Easy Recipe

    Pita bread is a timeless favourite in kitchens around the world, known for its soft texture and signature pocket in the middle. While this Middle Eastern staple can be easily found in grocery stores, making it from scratch at home is a rewarding experience. The process is simpler than it may seem, and with a few simple tricks, you can enjoy perfectly fluffy, pillowy pita bread that’s just as good as anything you’d find in a bakery. Chef Kirti Bhoutika shared an easy recipe for homemade pita bread in an Instagram post.

    Also Read: How To Cook The Perfect Falafel

    But first, let’s explore what pita bread is, what it’s made from, how to pair it, and-most importantly-how to make it soft, fluffy, and delicious in your own kitchen.

    What is Pita Bread?

    Pita bread is a round, flatbread traditionally made from wheat flour, water, and yeast. Its most iconic feature is the “pocket” that forms when the dough puffs up during baking. This pocket makes it an ideal choice for stuffing with fillings, dips, or sandwiches. Pita bread is an integral part of Middle Eastern, Mediterranean, and North African cuisines, but its appeal has spread worldwide. Its light, airy texture, slightly chewy bite, and neutral flavour make it a versatile addition to any meal. It is commonly paired with hummus dip. 

    What is Pita Bread Made Of?

    The basic ingredients for pita bread are simple, and they come together to create a soft, pillowy dough. Here’s what you’ll need to make your own pita bread:

    • All-purpose flour: This is the main ingredient that forms the structure of the bread.
    • Instant dry yeast: Yeast is what makes the dough rise and gives the bread its airy texture.
    • Caster sugar: The sugar helps activate the yeast and enhances the bread’s flavour.
    • Salt: Salt brings balance to the flavour of the dough.
    • Warm water: Warm water is essential for activating the yeast and helping the dough come together.
    • Olive oil: Olive oil adds richness and helps keep the bread soft.

    Also Read: High-Protein Diet: How To Make Desi-Style Rajma Hummus (Recipe Inside)

    Tips To Make Soft, Fluffy Pita Bread

    The key to making the perfect pita is a soft, well-hydrated dough and careful attention during the cooking process. Follow these important steps for soft, fluffy pita bread every time:

    Make the Dough Soft: The most crucial step is to ensure your dough is super soft. When you knead the dough, it should be elastic and smooth, but not sticky or dry. If it feels too stiff, add a little more warm water to achieve a soft, supple dough that will rise beautifully.

    Allow the Dough to Rise: Once you’ve kneaded your dough, cover it with a damp cloth and let it rise for about 1 hour, or until it doubles in size. This step allows the yeast to work its magic, giving the dough a light texture.

    Rest Before Cooking: After dividing the dough into portions and rolling them out, it’s important to let the dough rest for 15-20 minutes before cooking. This rest period allows the gluten to relax and results in a softer, more pliable pita that will puff up properly in the pan.

    Rotate the Pita for the Perfect Puff: When cooking the pitas on a hot tawa (griddle), it’s essential to flip the bread every 15-20 seconds. This technique ensures even cooking and helps the pita achieve its signature puff. Keep rotating the pita until it inflates like a balloon.

    How To Make Soft Pita Bread I Homemade Pita Bread Recipe:

    Here’s a simple recipe to make your own fluffy pita bread at home:

    1. Mix the Dough: In a bowl, combine the flour, yeast, sugar, and salt. Gradually add warm water and olive oil, kneading the mixture into a soft dough. If the dough feels stiff, add more water until it becomes smooth and elastic.
    2. Knead the Dough: Knead the dough for 10-12 minutes until it’s smooth and elastic. Cover the dough with a damp cloth and let it rise for about 1 hour, or until it doubles in size.
    3. Roll Out the Dough: Punch the dough down, divide it into equal portions, and roll them out on a floured surface. Place the rolled dough on a tray, cover it with a damp cloth, and allow it to rest for 15-20 minutes.
    4. Cook the Pitas: Heat a tawa or griddle over medium heat. Place one rolled pita on the tawa, and cook until slightly puffed on one side. Flip it over and continue flipping every 15-20 seconds until the pita inflates and turns golden.
    5. Enjoy: Your fluffy pita pockets are ready to be filled with your favourite ingredients or served with dips!

    What To Pair With Pita Bread

    Pita bread is incredibly versatile, and its soft texture makes it perfect for a variety of dishes. Here are some delicious ways to pair homemade pita bread:

    • Stuffed Pitas: Fill pita pockets with your favourite ingredients for a quick and satisfying meal. Some popular fillings include falafel, shawarma, grilled vegetables, and hummus. For a fresh twist, add leafy greens, pickled vegetables, or tzatziki sauce.
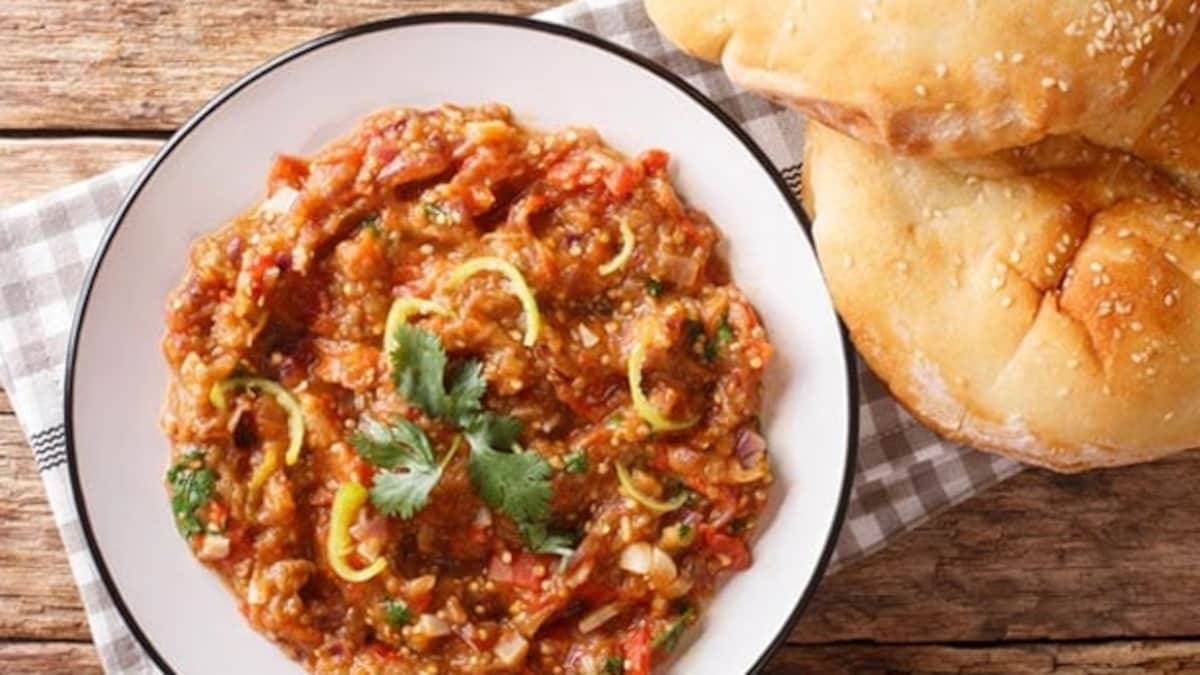
    • Dips: Pita bread is an excellent accompaniment to dips like hummus, baba ganoush, tzatziki, and muhammara. Simply tear off pieces of the pita and scoop up your dip for a delightful snack or appetizer.
    • Pita Chips: For a crispy snack, slice pita bread into triangles, brush with olive oil, and bake until golden brown. These pita chips pair wonderfully with dips or can be enjoyed on their own as a crunchy snack.
    • Wraps: Use your homemade pita as a wrap for grilled meats, vegetables, or cheeses. It’s an excellent alternative to tortillas and adds a slightly chewy, satisfying element to any wrap.

    Enjoy the delicious results and experiment with different fillings and pairings to make your pita experience truly unforgettable!

    (Disclaimer: This content including advice provides generic information only. It is in no way a substitute for qualified medical opinion. Always consult a specialist or your own doctor for more information. NDTV does not claim responsibility for this information.)


    Source link

  • Struggling With Low Winter Immunity? This Amlaprash Recipe Has Come To Your Rescue

    Struggling With Low Winter Immunity? This Amlaprash Recipe Has Come To Your Rescue

    Winter’s here, and with it comes a major drop in temperature. While we naturally crave hot, comforting dishes, some ingredients can warm you up from the inside out. Enter Indian Gooseberries, or Amla, a winter superfood with a ton of health benefits. You’ll find lots of ways to enjoy this fruit during the colder months, and one of the best is Amlaprash-a desi take on the Ayurvedic health supplement, Chyawanprash. If you love amlas, this is your chance to indulge! Here’s how you can whip up this immunity-boosting treat at home.

    Also Read: Amla For Immunity: Homemade Amla Candy Recipe And Health Benefits Of Amla

    Latest and Breaking News on NDTV

    Photo Credit: iStock

    Health Benefits Of Having Amla In Winter

    Consuming amla in any form during winter is essential for your health. This fruit does wonders for your body in several ways.

    1. Packed with Vitamin C

    Amla is loaded with vitamin C, which helps keep your body healthy and boosts immunity to fight off cold and flu.

    2. Low In Fat

    Amla has low carbs and fat, which not only boosts your metabolism but also helps control cravings.

    3. Beneficial For Eyes

    Since amla is rich in vitamin A, it’s great for keeping your eyes healthy. It can also help with common eye issues like itching or watering.

    4. Keeps Skin Healthy

    With its high levels of vitamins A and C, fatty acids, and antioxidants, amla works as a natural anti-aging ingredient, keeping both skin and hair looking fresh.

    Latest and Breaking News on NDTV

    Should You Refrigerate Amlaprash?

    Whether you store amlaprash in the fridge depends on the temperature around you. Once made, it can stay outside for up to two months. After that, it’s best to pop it in the fridge, where it will stay fresh and flavorful for another 3-4 months.

    How To Make Amlaprash | Easy Amlaprash Recipe

    Making immunity-boosting amlaprash at home is super easy. This recipe was shared by content creator and chef Sneha Singhi Upadhaya on Instagram. Here’s how to make it:

    1. Prepare Amlas

    Wash 8-9 amlas and steam them in a steamer for 15-20 minutes, or until they’re soft.

    2. Prepare Spices

    In a pan, dry roast cinnamon, elaichi, badi elaichi, cloves, star anise, peppercorn, and bay leaves on low heat. Let them cool and grind them into a smooth powder. Set it aside.

    3. Prepare Paste & Amlas

    In a blender, combine raisins, dates, ginger, and tulsi with a little water. Blend into a thick paste. Then, deseed the amla and blend it into a smooth paste once it’s cool.

    4. Assemble

    Heat some ghee in a pan. Add the amla paste and cook it for 4-5 minutes. Once it starts sticking to the pan, add jaggery and cook for another 2 minutes. Then, add the date paste, ground spices, and saffron, and cook on low heat until it dries out and changes color. Garnish with silver vark and extra saffron for that final touch. Enjoy!

    Watch the full video here:

    Also Read: Want Your Kids To Eat Amla? 4 Fun Amla Recipes To Include This Superfood In Their Diet

    Will you try this amlaprash recipe at home? Let us know in the comments below!


    Source link

  • Kadi Patta Chaat: This Unique Recipe Will Make You Forget About Palak Patta Chaat

    Kadi Patta Chaat: This Unique Recipe Will Make You Forget About Palak Patta Chaat

    If you’re a chaat lover, you probably would’ve tried palak patta chaat at some point. The combination of crispy palak leaves topped with curd and tangy chutneys makes it quite drool-worthy. While palak patta chaat enjoys a huge fan following, there’s no harm in trying new chaat recipes, right? Make way for kadi patta chaat – a unique take on the classic palak patta chaat. This chaat is great for times when you feel like treating your taste buds to something different. Plus, it can also be a saviour for when you’ve run out of palak leaves but still want to enjoy similar flavours. Intrigued about how to make it at home? Read on!
    Also Read: Dry Fruit Chaat Recipe: This Delightful And Nutritious Snack Is Perfect For Your Chaat Cravings

    Add image caption here

    Photo Credit: iStock

    What Is Kadi Patta Chaat?

    As the name suggests, this chaat is prepared using kadi patta (curry leaves). The leaves are coated with a spicy besan batter and deep-fried to perfection. They are then topped with curd, spices, mint chutney, coriander, and pomegranate. The result is a lip-smacking chaat recipe that will leave you yearning for more. It is easy to prepare, packed with flavour and makes for a delicious snack to serve to your guests.

    Is Kadi Patta Chaat Healthy?

    This depends on how you prepare the kadi patta chaat. In this recipe, the kadi patta is deep-fried, which makes it oily and calorie-dense. However, feel free to air-fry or bake the kadi patta leaves to make the chaat healthier. This way, you won’t have to stress about consuming extra calories.

    How To Make Kadi Patta Chaat At Home | Kadi Patta Chaat Recipe

    The recipe for this kadi patta chaat was shared by MasterChef Aruna Vijay on her Instagram. Here are the steps you need to follow:

    1. Prepare The Batter

    For this, add besan, rice flour, ajwain, hing, haldi, jeera powder, and salt to a large bowl. Gradually add water and mix well to form a smooth batter. Aim for a thin-medium consistency for the best results.

    2. Fry The Curry Leaves

    Next, add the curry leaves and coat them well with the besan batter. Heat oil in a kadhai and deep-fry them until they turn golden brown and crispy.

    3. Assemble And Serve

    Now, arrange the fried curry leaves on a plate and top them with curd, mint chutney, black salt, cumin powder, red chilli powder, coriander leaves, pomegranate, and beetroot. Your kadi patta chaat is now ready!
    Also Read: Craving Chaat? Try This Protein-Packed Chatpati Dahi Chana Chaat Recipe

    Watch the complete video below:

    Looks delicious, doesn’t it? Try making it at home and let us know how you found its taste in the comments below.


    Source link

  • Making Chocolate Cake Just Got Easier! Try This Easy Blender Recipe Today For Instant Joy

    Making Chocolate Cake Just Got Easier! Try This Easy Blender Recipe Today For Instant Joy

    Chocolate Cake: There are a few things in life that bring instant joy – one of them is a rich and moist chocolate cake. No matter what mood we may be in, indulging in a slice of chocolate cake makes everything better, doesn’t it? However, there may be times when you’re in a hurry and don’t have enough time to go through the tiresome process of baking. Wondering how you can simplify the process? Well, we’ve got you covered with an incredibly easy recipe that involves using a blender. Yes, you heard that right! This means you don’t need to do much. Simply blend, blend , blend, and then bake to perfection! The recipe is eggless, so everyone can enjoy it! Before we get into the recipe, let’s address some questions you might have about this chocolate cake.
    Also Read: 3 Quick And Easy Methods For Baking The Perfect Chocolate Cake At Home

    Add image caption here

    Photo Credit: iStock

    Can You Bake This Cake In A Microwave Instead Of An Oven?

    This recipe calls for combining all the ingredients in a blender and then baking in an oven, but feel free to bake it in a microwave. It will yield similar results to baking it in an oven. However, remember to use a microwave-safe container to bake your chocolate cake. Also, make sure to rotate the container in between for even cooking.

    Can You Make An Egg-Based Version Of This Chocolate Cake?

    Absolutely! You can bake this chocolate cake using eggs as well. Simply add them along with all the other ingredients and blend as you normally would. There are no additional steps involved in baking an egg-based version of this cake. Your chocolate cake will taste just as good – even softer. So, go ahead and add them without any worries.

    Easy Chocolate Cake Recipe: How To Bake Chocolate Cake Using A Blender:

    This quick and easy chocolate cake recipe has been shared by the Instagram page @burrpet_by_dhruvijain. To make it, all you have to do is add oil, powdered sugar, yoghurt, cocoa powder, maida, vanilla essence, milk, and salt to a blender. Blend it for a minute and then add baking powder, baking soda, and lemon juice. Mix everything well. Pour the prepared chocolate batter into a greased tin and bake in a preheated oven at 180 degrees C for 40-45 minutes. That’s it! You have a freshly baked super soft chocolate cake ready to be relished. Enjoy it as is, or top it with chocolate ganache.
    Also Read: 5-Min Protein-Rich Chocolate Cake Recipe For Sudden Sweet Cravings

    Watch the complete recipe video below:

    Looks amazing, doesn’t it? Go ahead and bake it today, and watch it become a staple for birthdays and other celebrations. Happy Baking!

    About Vaishali KapilaVaishali finds comfort in eating parathas and rajma chawal but is equally enthusiastic about exploring different cuisines. When she’s not eating or baking, you can often find her curled up on the couch watching her favourite TV show – FRIENDS.


    Source link

  • Grilled Pineapple Recipe: A Must-Try Sweet And Spicy Treat For The Taste Buds

    Grilled Pineapple Recipe: A Must-Try Sweet And Spicy Treat For The Taste Buds

    Pineapple, with its tropical sweetness and tangy flavour, is a fruit that is loved around the world. While it is commonly enjoyed fresh or in fruit salads, grilling pineapple is a unique and exciting way to elevate its flavours. Grilled pineapple, with its caramelized edges and smoky undertones, offers a perfect balance of sweetness and spice. When combined with a few simple seasonings, it becomes a mouthwatering treat that will leave you craving more. Whether you’re preparing it for a summer barbecue, a healthy snack, or as a dessert, grilled pineapple is sure to impress. We found this recipe on the Instagram page ‘MasterChef Gurkirat Singh’. Let’s see how to make it. 

    Also Read: 10 Best Pineapple Recipes

    How to Make Grilled Pineapple I Grilled Pineapple Recipe

    Grilled pineapple is easy to prepare, requiring minimal ingredients and just a few steps. Here’s what you’ll need:

    Start by peeling the pineapple and cutting it into thick slices. You can also cut it into rings if you prefer. Make sure to remove the core, as it’s tough to eat and not as flavorful as the rest of the fruit.

    In a small bowl, mix the red chilli powder, cumin powder, chaat masala, and salt. These spices will give the pineapple a delightful kick, enhancing its natural sweetness with savoury, tangy, and slightly spicy notes. Sprinkle the spice mix evenly over both sides of the pineapple slices and sprinkle lemon juice. 

    Preheat your grill or grill pan over medium heat. In this video, the pineapple is grilled in a regular sandwich maker! Place the pineapple slices on the grill, and cook for 3-4 minutes on each side, or until grill marks form and the pineapple becomes slightly caramelized. The heat will help bring out the natural sugars in the pineapple, resulting in a perfect balance of sweetness and smokiness.

    Serve and Enjoy: Serve the grilled pineapple slices as a standalone snack, a side dish, or even as a topping for ice cream or yoghurt. The smoky, spicy pineapple pairs beautifully with a variety of other flavours, making it a versatile addition to any meal.

    Watch the complete recipe video below:

    Here Are 6 Benefits of Pineapple:

    Not only is grilled pineapple a treat for your taste buds, but it also offers several health benefits.

    1. Rich in Vitamin C

    Pineapple is an excellent source of vitamin C, which is essential for a strong immune system, healthy skin, and overall good health. Just one cup of fresh pineapple provides more than 100% of your daily recommended intake of vitamin C. This powerful antioxidant helps protect the body against free radicals, boosts collagen production for skin elasticity, and supports the immune system in fighting off infections.

    2. Aids Digestion

    Pineapple contains bromelain, a mixture of enzymes that aid in the digestion of proteins. Bromelain helps break down protein molecules, making it easier for the body to absorb nutrients from food. Consuming pineapple regularly may promote better digestion, reduce bloating, and alleviate indigestion or discomfort after heavy meals.

    Also Read: 5 Quick And Easy Grilled Chicken Snacks You Must Try

    3. Supports Heart Health

    Pineapple is also a heart-healthy fruit due to its high content of antioxidants, fibre, and potassium. Antioxidants help reduce inflammation, which can protect the heart and blood vessels from damage. The fibre content in pineapple helps regulate cholesterol levels, and the potassium content supports healthy blood pressure. Regular consumption of pineapple, combined with a balanced diet, can support cardiovascular health.

    4. Boosts Immunity

    With its high vitamin C content, pineapple plays a crucial role in strengthening the immune system. Vitamin C is known to stimulate the production of white blood cells, which help fight off infections and protect the body from diseases. Bromelain also has anti-inflammatory properties that can help reduce symptoms of colds, allergies, or sinus congestion, making pineapple a great fruit to incorporate into your diet during flu season.

    5. Promotes Skin Health

    The vitamin C in pineapple is not only beneficial for internal health but also for external beauty. Vitamin C helps reduce wrinkles, promotes collagen production, and improves skin elasticity, making your skin look younger and more radiant. Additionally, the bromelain enzyme in pineapple has anti-inflammatory and skin-healing properties, making it great for reducing redness, swelling, and skin irritation when applied topically.

    6. Aids in Weight Loss

    Pineapple is low in calories and high in fibre, making it an ideal fruit for anyone looking to lose weight or maintain a healthy weight. The fibre helps keep you full for longer, reducing the chances of overeating. Additionally, bromelain is believed to aid in fat digestion, helping to break down fats and proteins more efficiently. By incorporating pineapple into a balanced diet, you can enjoy a nutritious, filling snack that supports weight management.

    So grab a ripe pineapple, and enjoy this flavorful, healthy treat today!


    Source link

  • This Garlic Pepper Chicken Recipe Is Just What You Need In Winter To Satisfy Your Cravings

    This Garlic Pepper Chicken Recipe Is Just What You Need In Winter To Satisfy Your Cravings

    Winter is synonymous with piping hot snacks, and for many of us, Indo-Chinese cuisine hits just the right spot during this season. The roadside Chinese vans bustling with crowds are a testament to this love for street-style food and its unique taste. From fried rice to chilli chicken and chilli paneer, Indo-Chinese cuisine offers countless mouthwatering dishes. Just thinking about them makes our mouths water! If you’re a big fan of Indo-Chinese flavours, garlic pepper chicken is one dish you must try. This delectable starter is perfect for the winter season and can be prepared in just a few minutes. Whether you’re craving a cosy snack or planning to serve a crowd-pleasing appetizer at a party, garlic pepper chicken is a winner.
    Also Read: Move Over Chili Chicken, Make This Fiery Red Dragon Chicken Instead (Recipe Inside)
    In this recipe, boneless chicken is cooked with an abundance of garlic, spicy sauces, and a generous dose of black pepper. The marinated chicken pieces are deep-fried and then tossed in a thick, flavorful gravy. Its spicy kick, courtesy of black pepper, makes it an ideal winter treat. So, without further ado, let’s dive into the steps to create the perfect garlic pepper chicken at home.

    Use Boneless Chicken

    Garlic pepper chicken is a quick-cook dish, so boneless chicken pieces are ideal. Opt for chicken thighs or breasts, and cut them into medium-sized cubes. These pieces cook faster and are easier to fry.

    The Coating

    Before frying, marinate the chicken with black pepper, vinegar, ginger-garlic paste, soy sauce, and cornflour. Be mindful of the cornflour quantity-it should create a light coating on the chicken, ensuring a crispy texture without being too thick.

    The Right Use of Garlic

    Garlic is the star ingredient of this recipe, so don’t skimp on it. Using too little garlic can dull the flavour. Add garlic paste during marination for depth, but finely chopped garlic is a must for the gravy. The chopped garlic releases its aroma and elevates the dish’s flavour.

    Fry The Chicken

    Heat the oil thoroughly before frying, then lower it to medium heat before adding the chicken pieces. This ensures even cooking and prevents burning. Fry the chicken until it achieves a beautiful golden colour. Avoid frying on high heat, as this may burn the coating while leaving the inside undercooked.

    How to Make Garlic Pepper Chicken I Garlic Pepper Chicken Recipe

    Marinate The Chicken

    Marinate the chicken pieces with vinegar, ginger-garlic paste, black pepper, salt, and cornflour to the chicken and mix well.

    Fry the Chicken:

    Fry the marinated chicken on medium flame until golden brown. Remove and set aside.

    Prepare the Base:

    Saute chopped onions, garlic, and green chillies until fragrant. Add the chopped capsicum also.

    Make the Sauce:

    Combine soy sauce, red chili sauce, tomato ketchup, vinegar, black pepper and a splash of water.

    Thicken the Gravy:

    Prepare a slurry by mixing 1 tablespoon of cornflour with water. Add it to the gravy.

    Combine and Serve:

    Add the fried chicken to the prepared gravy and cook for a minute.

    Your delicious garlic pepper chicken is now ready to serve!

    So, try this mouthwatering recipe and treat yourself to a delightful winter indulgence. Don’t forget to let us know how much you loved it!

    Happy Cooking!

    Source link

  • Dry Fruit Chaat Recipe: This Delightful And Nutritious Snack Is Perfect For Your Chaat Cravings

    Dry Fruit Chaat Recipe: This Delightful And Nutritious Snack Is Perfect For Your Chaat Cravings

    Chaat is nothing short of a love language for us Indians. Be it tangy, spicy, or sweet, chaat has the burst of flavours that we all love. From the delightful aloo tikki chaat to the fiery papdi chaat and the zingy dahi puri, there’s a chaat recipe for every mood. Now that winter is here, it is natural to long for those crunchy and flavourful bites. But what if we could get the same crunch, taste, and thrill of chaat without any (deep-fried) guilt? Here, we bring you a healthy and delicious dry fruit chaat! Packed with nutrients and super quick to make, this recipe is the perfect combination of taste and nutrition. Intrigued on how to make it? Well, you should be! Let’s find out how you can make dry fruit chaat at home!

    Also Read: Craving Chaat? Try This Protein-Packed Chatpati Dahi Chana Chaat Recipe

    10 Must-Haves In Your Everyday Office Bags

    Photo: Pexels

    Why You Shouldn’t Miss Out on Having Dry Fruit Chaat This Winter:

    Since winter calls for wholesome, nourishing snacks, dry fruit chaat ticks all the boxes. Packed with energy-boosting nuts like almonds, cashews, and peanuts, this chaat is a powerhouse of healthy fats, proteins, and antioxidants, which is ideal for staying warm and active. This chaat recipe is also a great way to use dry fruits and nuts you might have lying around the house. Thanks to other crunchy additions in the recipe, this chaat dish is crunchy, flavourful, and guilt-free!

    Can Dry Fruit Chaat Be Prepared In Advance?

    Absolutely! You can store dry fruit chaat for later but with some tips. Since it includes roasted nuts and fresh ingredients, it is best to consume it fresh for optimal taste and texture. However, you can prepare the roasted nuts in advance and store them in an airtight container for up to a week. When you are ready to serve, just toss the nuts with fresh veggies and ingredients without any hassle.

    Add image caption here

    Photo: iStock

    How to Make Dry Fruit Chaat | Dry Fruit Chaat Recipe

    Making dry fruit chaat at home is quick and easy. This recipe was shared by Instagram user @somewhatchef. To make this:

    1. Prepare Nuts

    Take a handful of almonds and cashews. Soak them in hot water for just 15 minutes. In the meantime, take a skillet and add some ghee to it. Once hot, add raw peanuts and toast for a minute. Then add the soaked almonds and cashews to the tawa and toast for another minute.

    2. Add Other Ingredients

    While the nuts are getting roasted, make some room on the tawa and add chopped bell peppers and boiled rajma. Mix all the ingredients well.

    3. Season

    To add flavour, sprinkle some chaat masala, jeera powder, and black salt in the mixture. Squeeze in some lemon juice for a tangy twist and mix all the ingredients. Garnish with roasted makhanas and pomegranate arils and enjoy!

    Watch the full video below:

    Also Read: 5 Healthy Chaat Recipes Under 15 Mins; You Won’t Mind Having These On Repeat

    Will you try this dry fruit chaat recipe at home? Let us know in the comments below.


    Source link

  • Akuri Eggs Recipe: This Parsi-Style Scrambled Eggs Recipe Is Sure to Amp Up Your Morning Plates

    Akuri Eggs Recipe: This Parsi-Style Scrambled Eggs Recipe Is Sure to Amp Up Your Morning Plates

    Let’s just agree – eggs are the ultimate breakfast hero. They are quick, versatile, and packed with protein. From poached to fried, sunny-side-up to boiled, there’s no end to the ways you can consume them. When it comes to a power-packed breakfast, the humble masala omelette often gets preference. But if you’re an egg lover looking to jazz up your morning plate, we’ve got a unique (and tried and tested!) dish for you – Akuri, Parsi-style scrambled eggs! No, it’s nothing like masala eggs. It’s actually creamy, spicy, and without a doubt, a flavour bomb! Want to learn how to make it? Read on to find out more.

    Also Read: Cooking Tips: 7 Mind-Blowing Egg Hacks That Will Make Your Life Easier

    Latest and Breaking News on NDTV

    What Is Akuri (Parsi-Style Scrambled Eggs)?

    You can think of Akuri as scrambled eggs’ flavorful cousin. This Parsi favourite is creamy, rich, and packed with bold flavours. Akuri requires minimal ingredients from your pantry. The best part is that it’s easy to make and comes together in just 20 minutes. If you want to add a delightful twist to your monotonous morning breakfast, this recipe could be your go-to! Pair it with warm bread or pav, and you’re good to go!

    What’s the Difference Between Akuri and Bhurji?

    Now, you might be wondering how Akuri differs from your everyday egg bhurji. While both are spicy and scrambled, there’s one key difference – Akuri is all about creamy perfection and is slightly runny in nature. In comparison, bhurji takes longer to cook and is drier and firmer in texture. The creaminess and runny nature of Akuri make it the perfect accompaniment for bread and pav!

    Latest and Breaking News on NDTV

    Photo Credit: iStock

    How to Make Parsi-Style Scrambled Eggs | Akuri Recipe

    Making these Parsi-style scrambled eggs at home is super easy. This recipe was shared by content creator Karan Gokani on Instagram. To make it:

    1. Prepare the Eggs

    Start by cracking eggs into a bowl. Season them with salt and whisk until the ingredients are well combined. Set aside for 10 minutes.

    2. Prepare the Masala

    Heat a pan on medium flame and add a dollop of butter. Chop onions, tomatoes, and green chillies. Add the vegetables to the buttered pan and sauté until soft. Once tender, add your spices – chilli, turmeric, coriander, and cumin. If the mixture becomes too thick and starts to stick, add a splash of water and let it cook. Garnish with freshly chopped coriander leaves and give it a good mix.

    3. Combine the Ingredients

    Once the masala is ready, add the whisked eggs to the mixture and combine. Switch off the flame and let the eggs cook in the pan’s heat. Keep stirring and mixing the eggs to ensure they’re well combined with the masala mixture. Add a tablespoon of butter and a dash of vinegar, then mix well. Pair with bread and enjoy!

    Watch the full video below:

    Also Read: Egg Keema Pulao, Mughlai Egg And More: 5 Delicious Egg Recipes For Dinner

    Will you try this delicious egg recipe at home? Let us know in the comments below.


    Source link

  • Bored of Baingan Ka Bharta? This Delicious Shalgam Bharta Recipe Will Be Your New Winter Favourite

    Bored of Baingan Ka Bharta? This Delicious Shalgam Bharta Recipe Will Be Your New Winter Favourite

    Winter’s here, and it’s time to dive into the seasonal wonders that make this time of year so amazing. From leafy greens to hearty root veggies, the season’s produce is all about comfort. And one veggie that doesn’t get enough love? Shalgam (turnip)! Its subtle sweetness and versatility make it a winner when cooked right. Whether you’re a die-hard fan or just looking to try something new, we’ve got the perfect recipe for you—Shalgam ka Bharta. Simple, tasty, and a game changer for your lunch routine. Serve it with dal and roti, and you’ve got a warm, satisfying meal. What are you waiting for? Let’s make this!

    Also Read: Monday Blues? Turn It Around With Chicken Bharta For A Delicious Start To Your Week

    Add image caption here

    Photo: iStock

    What Is Shalgam Ka Bharta? 

    Shalgam ka Bharta is a beloved North Indian dish that turns humble turnips into something delicious. It’s easy to make, perfect for everyday lunches and brings out the best of winter’s produce. The best part? It’s super versatile—just like baingan ka bharta—so you can adjust the ingredients however you like. If you’re a fan of baingan ka bharta, this flavorful twist will quickly win you over.

    Why You Shouldn’t Miss Out On Shalgam This Winter

    Beyond being a winter staple, shalgam is packed with health benefits that make it a must-have for your meals.

    1. Shalgam is rich in dietary nitrates that may help lower blood pressure and promote better blood vessel health.
    2. Thanks to lutein, an antioxidant, shalgam can keep your eyes healthy and help prevent issues like cataracts.
    3. Full of fibre, shalgam aids digestion by absorbing water in the intestines, making bowel movements smoother.
    4. Shalgam is also high in lipids that can boost your metabolism, helping with fat storage and regulating blood sugar levels. Not to mention, this shalgam ka bharta is super easy to whip up and makes for the perfect family lunch.

    How To Make Shalgam Ka Bharta Interesting For Kids? 

    Getting kids to eat shalgam ka bharta can be a challenge, but there’s an easy fix. After making the bharta, add a dollop of butter to make it extra creamy. You can even toss in some sautéed veggies and spread it on a crispy paratha. Roll it up and serve as a fun and tasty lunchbox option!

    Add image caption here

    Photo: iStock

    How To Make Shalgam Ka Bharta | Shalgam Bharta Recipe 

    Making shalgam ka bharta is a breeze! Here’s how to do it, thanks to the recipe shared by @dillifoodies on Instagram:

    1. Prepare Turnips

    Wash and peel 5-6 turnips (shalgam), then chop them into cubes. In a pressure cooker, add some water, bring it to a boil, and toss in the chopped turnip. Cook for 3-4 whistles, then mash the turnip once the pressure is released.

    2. Prepare Masala

    Heat oil in a kadhai, then add chopped onions and cook them on medium heat. When they turn light brown, add chopped tomatoes, ginger, and green chillies. Cook until the tomatoes soften, then add salt, red chilli powder, and coriander powder. Let the masala cook on low heat until the oil separates.

    3. Combine Ingredients

    Add the mashed turnip and a pinch of sugar to the masala. Stir everything together and cook for another 5-7 minutes to let the flavours meld. Garnish with fresh coriander leaves and serve!

    Check out the full video below:

    Also Read: Cooking Tips: 5 Interesting Ways To Cook With Shalgam

    Will you be giving this Shalgam ka Bharta recipe a try? Drop your thoughts in the comments below!


    Source link

  • This Corn Ribs Recipe Gives Your Classic Corn On The Cob A Flavourful Makeover

    This Corn Ribs Recipe Gives Your Classic Corn On The Cob A Flavourful Makeover

    Corn on the cob is one of the most loved snacks among kids and adults. A simple rub of salt and lime on corn makes for a delightful small meal but what if you spice it up a little to please your taste buds? These corn ribs are a fun and delicious snack that can be enjoyed by people of all ages. This corn snack recipe on the Instagram page ‘picklesandwine’ seems worth a try. The corn ribs are a great alternative to traditional snacks like chips and are packed with nutrients, making them a healthier choice.

    Also Read: 5 Healthy Chaat Recipes Under 15 Mins; You Won’t Mind Having These On Repeat

    Why Corn is Good for You

    Corn is a versatile grain that is rich in essential nutrients. It is a good source of fibre, which aids in digestion and helps you feel fuller for longer. Corn is also a good source of vitamins and minerals, including vitamin B, magnesium, and phosphorus. Additionally, it contains antioxidants that can help protect your cells from damage. Corn snacks are popular and loved on every occasion. 

    How To Make Corn Ribs I Corn Ribs Recipe:

    1. Roast the Corn: Preheat your oven to 200 degrees C (400 degrees F). Place the corn on the cob directly on the oven rack and roast for 20-25 minutes, or until the kernels are tender and slightly charred.
    2. Cut the Corn: Once the corn is cool enough to handle, cut it off the cob.
    3. Prepare the Sauce: In a small pan, melt butter and add garlic powder, coriander, salt, red chilli powder, and mixed herbs. Stir well.
    4. Toss the Corn: Toss the roasted corn with the prepared sauce, ensuring each kernel is evenly coated.
    5. Serve: Serve the corn ribs immediately, or store them in an airtight container for later.

    Also ReadChickpea Cutlet, Oat Cutlet And More: 5 High-Protein Cutlet Recipes You Must Try

    Other Corn-Based Snacks

    In addition to corn ribs, there are many other delicious and healthy snacks that you can make with corn. 

    Here are 3 Easy Corn Snacks Ideas:

    1. Popcorn: A classic snack that is low in calories and high in fibre. You can flavour it with various seasonings, such as salt, pepper, chilli powder, or nutritional yeast.
    2. Corn Chips: A healthier alternative to traditional potato chips, corn chips are crispy, and crunchy, and can be enjoyed with your favourite dips.
    3. Corn Fritters: These crispy fritters are made with a batter of cornmeal, flour, and spices. They can be served with a variety of dips, such as chutney or ketchup.

    So, the next time you’re looking for a healthy and satisfying snack, consider making some corn ribs or another corn-based treat.


    About Neha GroverLove for reading roused her writing instincts. Neha is guilty of having a deep-set fixation with anything caffeinated. When she is not pouring out her nest of thoughts onto the screen, you can see her reading while sipping on coffee.


    Source link